Mastering toolpath smoothing, tolerance, and machine settings for optimal machining
Imagine spending hours programming, setting up, and machining a part, only to scrap it because your roughing toolpaths gouged the final geometry beyond tolerance. The frustration of wasted time and material is all too real. All that effort was wasted due to settings that didn't account for how tolerance, smoothing, stock-to-leave settings, and machine motion interact.
When programming toolpaths, machinists must navigate various settings that impact part quality and machining efficiency. Poorly balanced settings often stem from costly errors and inefficiencies. Getting these right is the key to accurate, efficient machining, ensuring smoother motion, better finishes, and predictable results. Consider the following Fusion CAM settings for an Adaptive Roughing toolpath:
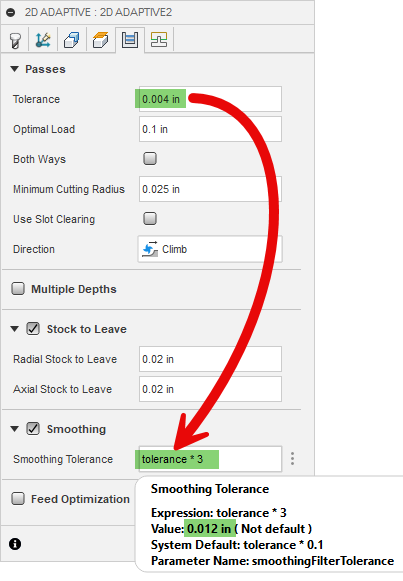
Tolerance of .004", smoothing tolerance set to tolerance × 3, gives a smoothing value of .012". Since overall toolpath tolerance is the sum of your tolerance and smoothing values, this results in an overall toolpath tolerance of .016". An overall toolpath tolerance is similar to a profile-of-a-surface tolerance in GD&T. An overall toolpath tolerance of .016" allows for a deviation of ±.008" from the theoretically perfect toolpath. If your radial stock-to-leave is only .005", the tool could gouge the final part geometry by up to .003" — before even factoring in machine smoothing and rounding settings, which could further increase the gouging.
While Toolpath works to better automate these problems with our CAM Automation, it's vital to understand these settings and their impact on your parts. Dialing in these settings is key to avoiding gouging, wasted time, and inconsistent finishes. Minor adjustments can make the difference between a smooth, efficient machining process and costly mistakes. Let's break down toolpath tolerance, smoothing, stock-to-leave, and machine motion settings to see how they impact machining outcomes.
Understanding toolpath tolerance
Toolpath tolerance determines how accurately the toolpath follows the programmed geometry. It directly impacts surface finish, cycle time, and how efficiently the machine processes motion. The key trade-off with tolerance settings is balancing precision with performance.
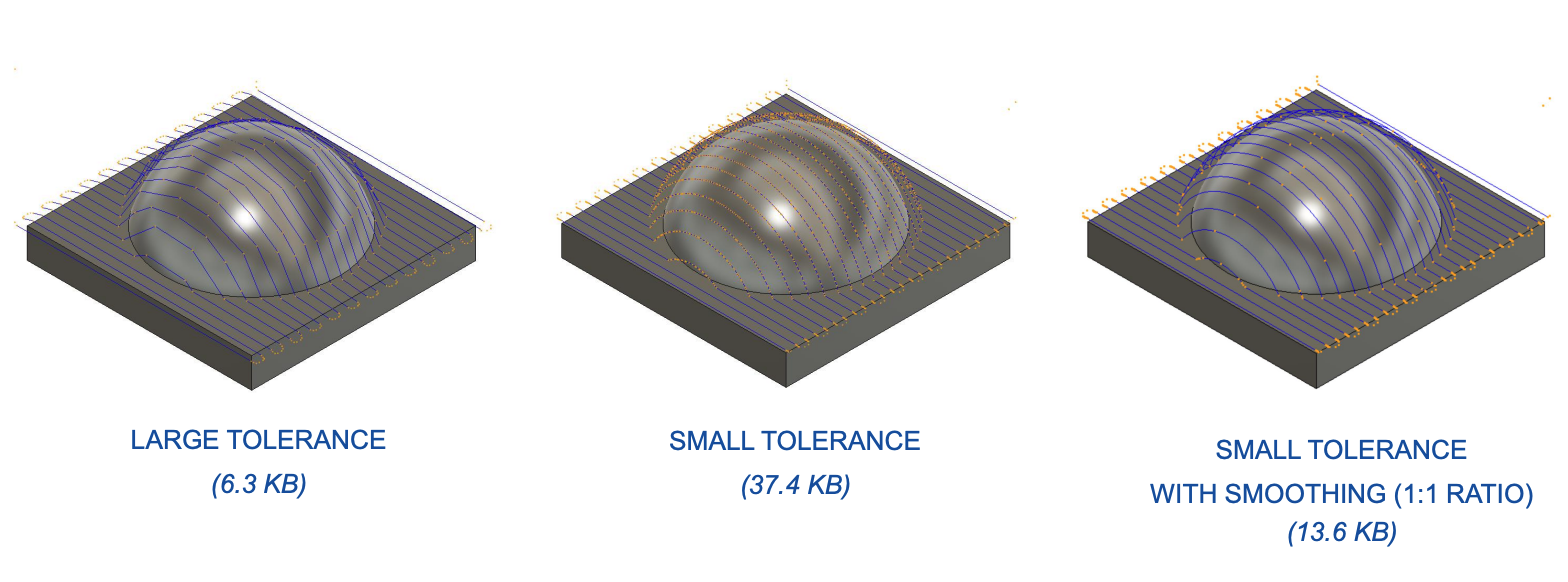
Smaller tolerance values create a toolpath that more closely follows the CAD model, resulting in a smoother surface finish but increasing the number of toolpath segments. This can significantly drive up CAM processing times, requiring more computational resources to generate the toolpath. Additionally, it can slow down machine motion, particularly on machines that struggle with high-data toolpaths.
Larger tolerance values reduce the number of toolpath segments, allowing for faster computation and machine processing but potentially deviating from the intended geometry. This is often acceptable for roughing operations where fine details are less critical. Sometimes this will create what appears to be choppy toolpaths, but often the machine tool will smooth these moves out and create quicker machine motion and lower cycle times.
It's essential to adjust tolerance based on the machining application. Tight tolerances are often required for finishing operations, particularly on complex 3D surfaces and spline-based features. In contrast, roughing operations can benefit from looser tolerances to improve efficiency without sacrificing essential part geometry. My default Fusion toolpath tolerance is .0005". Combined with my other settings, this works well for my Haas VF2SS machine while having reasonable toolpath calculation times on my MacBook Pro.
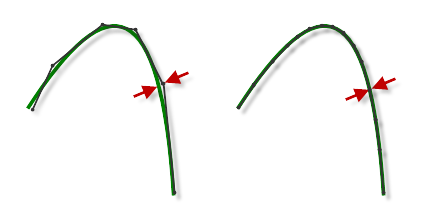
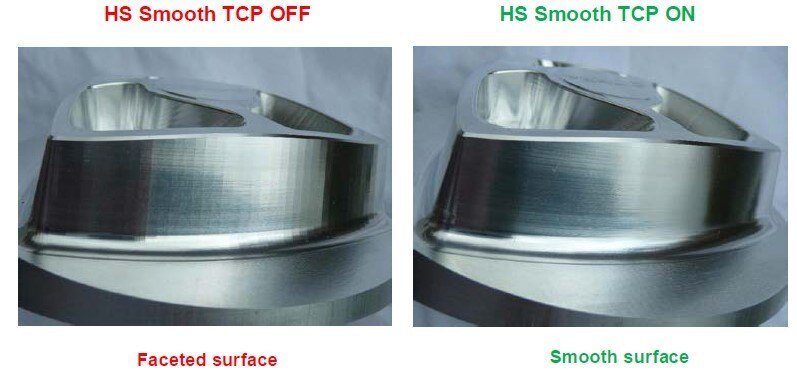
Toolpath smoothing and its impact
Smoothing refines toolpath motion by reducing abrupt transitions, leading to:
- Smoother machine movement — reduces jerky motions that can strain machine components.
- Improved surface finishes — minimizes erratic movement that leaves visible tool marks.
- Reduced vibration — particularly beneficial at high feed rates to prevent chatter and inconsistent cutting forces.
How smoothing is applied
There are three primary ways smoothing is implemented:
- Linearization (G1, no arcs). The CAM software outputs closely spaced linear G1 moves to approximate smooth curves. This approach is common when the machine control cannot handle arcs for complex contours or when the toolpath is generated as linear segments only. Some toolpath smoothing algorithms evenly space the points along the path, resulting in highly consistent point-to-point motion requirements.
- Arc fitting (G2/G3). The CAM software identifies geometry regions that can be represented as tangent circular arcs and outputs G2/G3 commands. This reduces code size and can help machines achieve smoother motion. Often, this can only be achieved on the XY, XZ, and YZ planes of the work coordinate system.
- Hybrid approaches. Some CAM software can smooth short segments into arcs up to a defined curvature limit, defaulting back to G1 segments when arcs are impractical.
Excessive smoothing can oversimplify toolpaths, potentially removing crucial geometry or introducing deviations in fine detail work. Striking a balance is essential for maintaining accuracy while achieving efficient motion. My Fusion default is to have smoothing turned off for all operations except for adaptive roughing, where I have it on by default and have the value set to an expression of tolerance × 3, giving me a default value of .0015". Combined with my other defaults, this works well for most of the parts I make on my machine.
Considering stock-to-leave
Stock-to-leave settings play a significant role in both roughing and finishing. Leaving appropriate material ensures slight variations from tolerance or smoothing do not compromise final accuracy. Roughing typically requires more stock to provide a buffer, while finishing operations usually don't need a stock-to-leave amount.
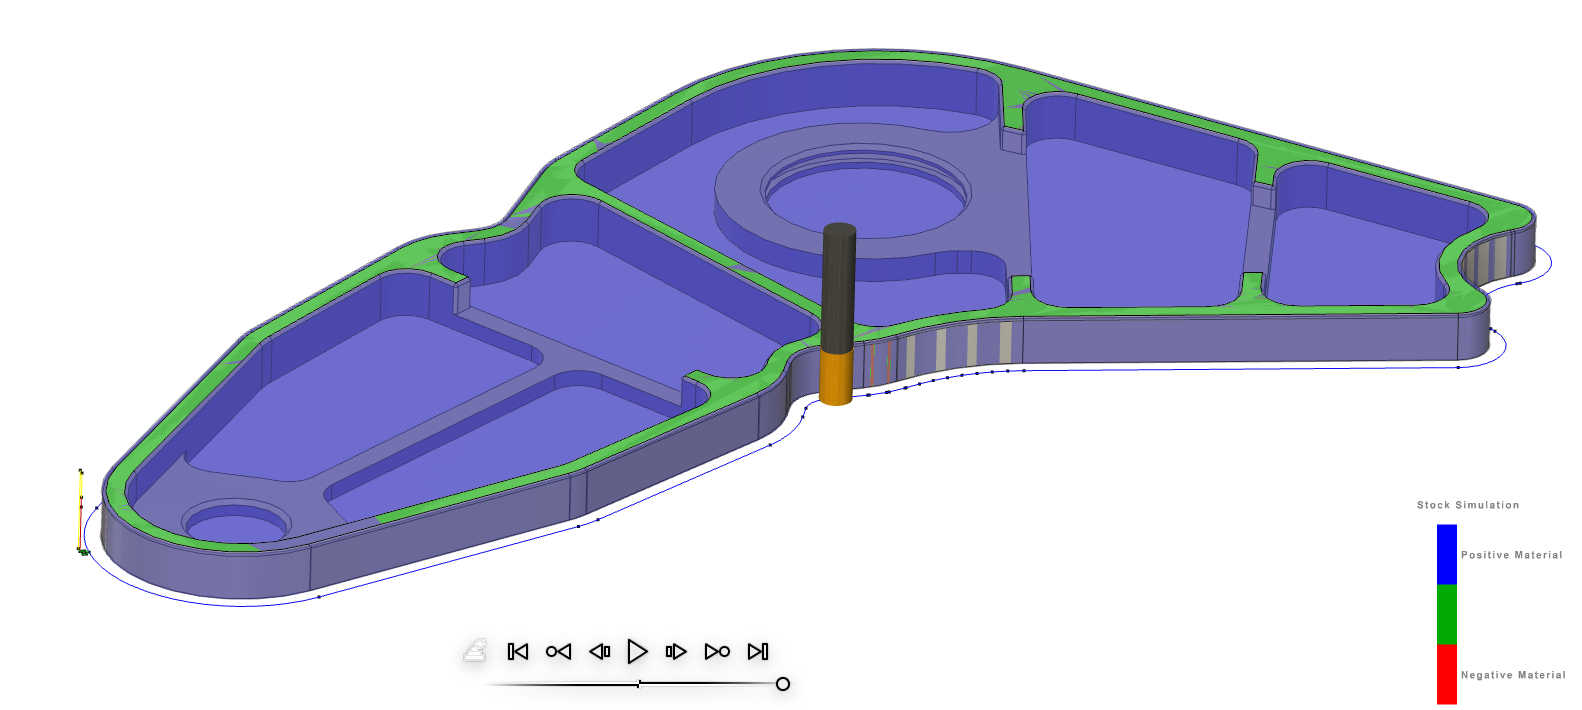
In the example above, we see both grey and red lines when simulating the profile in Fusion. In this 2D Contour operation, our total tolerance (tolerance + smoothing) is greater than the stock-to-leave. The grey areas indicate where the stock-to-leave is not obeyed, and the small red bands indicate an area where the roughing operation gouges the final part geometry. This is not always easily visible with the default stock simulation settings.
To prevent part gouging, a good rule of thumb for a stock-to-leave value for an Adaptive Roughing operation is roughly double the sum of your tolerance + smoothing value. You will also want to consider your part geometry and cutting conditions. My default stock-to-leave settings are .010" for both radial and axial, but I often change these values depending on feature details and other toolpath parameters. Most importantly, you must understand how all these parameters work together.
Machine smoothing and rounding
Machine controllers have built-in smoothing and rounding settings that influence toolpath execution. Most modern machines come with well-optimized default settings; in many cases, they do not need adjustment. However, understanding these settings can help refine motion beyond what is defined in CAM, particularly for specialized machining applications. You can add different G-codes to different toolpaths to further optimize how your machine works in various conditions.
Haas G187 smoothing control
Haas CNC machines use G187, which allows machinists to adjust how aggressively the machine smooths motion. It offers rough, medium, and fine corner rounding and path accuracy settings. G187 P1 (rough) speeds up machining by allowing more rounding, while G187 P3 (fine) prioritizes accuracy with tighter motion control. If you are unfamiliar with how this works, our friends CJ Abraham and Brian O'Fallon made a great video that I suggest you watch:
Fanuc AI Contour Control (AICC) and high-speed modes
Fanuc-controlled machines allow further toolpath refinement with G05.1 Q1, which provides 10 levels of speed-vs-accuracy control:
| Setting | Speed vs. accuracy balance | Best for |
|---|---|---|
| R1–R2 | Maximized speed, less accuracy | Rough machining |
| R3–R5 | Balanced speed and accuracy | Die & mold — roughing |
| R6–R8 | Higher accuracy, controlled speed | Die & mold — semi-finish |
| R9–R10 | Maximum accuracy, minimal smoothing | High-precision finishing |
G64 vs. G61 on Fanuc machines. G64 (cutting mode) enables continuous motion, allowing slight rounding of sharp corners for smoother motion. G61 (exact stop mode) forces the machine to pause at each toolpath point, ensuring high accuracy but potentially increasing cycle time.
Acceleration and jerk settings. These settings are typically set via parameters in the machine control, and most people don't change them. These settings dictate how quickly the machine ramps up and slows down motion. Machines with well-tuned acceleration and jerk parameters can process sharper direction changes more smoothly, while others may need more conservative values to avoid stuttering or overshooting. I've never personally changed these settings, but your experience may vary depending on the implementation of your machine tool. Having a good relationship with the 'top dog' application engineers is always wise. I've seen several machines super-tuned by the experienced app's person to show a nice improvement.
Properly leveraging machine-side smoothing enhances surface finish and reduces cycle times without compromising accuracy. Testing and adjusting these settings for your equipment is crucial for optimal performance. I've personally made drastic improvements to programs both in reducing cycle times and improving part quality by understanding and correctly applying these settings to programs. These super-geek details could set you apart from an average machinist to the one with the special sauce. I mostly leave my G187 settings turned on in post properties when I post out of Fusion, and Fusion usually does a great job changing the P values to match the toolpaths I'm running.
Optimizing for your machine
Every machine is unique; some quickly process massive amounts of code, while others require fewer line segments to avoid overloading. Properly adjusting your CAM settings ensures you get the best performance from your equipment.
While tighter tolerances improve accuracy, they can add unnecessary complexity. Meanwhile, smoothing aids efficiency but must be applied carefully to avoid losing important details. I've run machines that process insane amounts of G-Code with impressive smoothing results, and these machines love lots of tiny straight-line segments because the control smooths them out into beautiful machine motion. I've also run machines that appreciated toolpaths highly smoothed-out with arcs. My Haas machine likes a good balance of smoothed-out toolpaths, and I've got that recipe dialed in pretty well.
I've shared my personal defaults and settings above as a reference for what works well for my Haas machine at home, but these settings need to be dialed in for what works best for your machine and the parts you are making.
At Toolpath, our mission is to automate what works best for each unique shop while keeping machinists firmly in control of crucial parameters so you can leverage your special sauce to stand out in our industry. By making informed choices about smoothing and tolerance — and factoring in stock-to-leave alongside machine-specific settings — you can achieve top-notch surface finishes, nail your tolerances, and boost your overall productivity.
Next steps
- Understand. Take the time to learn and understand your CAM parameters and settings and your machine's complimentary settings and parameters.
- Experiment. Incrementally adjust smoothing and tolerance for different operations, noting effects on surface finish and cycle time. Check motion along and between your axes; some machines move very well in some directions but not others.
- Share. Help your machinist friends out, and be an active part of the machinist community on forums or social media to exchange experiences, insights, and best practices. Together, we are all more awesome.
Stay tuned. We regularly post updates and tutorials on CAM programming. Keep an eye on our blog and the Toolpath YouTube Channel for more tips.